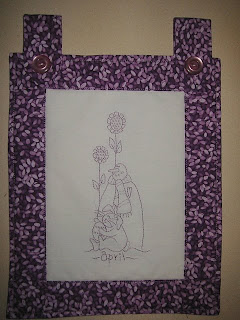
We'll be turning a hand-stitched embroidery into a mini quilt. The embroideries I used just happen to be from the Camelot Snowman patterns. I made both March and April at the same time and took lots of pictures along the way. But you could also substitute a quilt block or anything else for the center. Just so you know, the finished dimensions of the center are 5.5" x 7.5". The finished size of the quilt is 8.5" x 10.5" (not including the tabs).
So let's get started...
Materials:
- 8" x 10" piece of Kona cotton or Bella solid (for your embroidery)
- 1 Fat Quarter (18" x 20") for your border
- 8.5" x 10.5" piece of batting
- 7.5" wall hanger to display your quilt
- 2 buttons
- 3/4" x 2" piece of velcro (I used FabricFusion)
- 1/4" x 6" piece of fusible webbing (like Steam-a-Seam 2) (*optional)
Instructions:
1. Stitch your design on the 8" x 10" background. Your design must be smaller than 5.5" x 7.5". ( The larger size of the background allows for some shrinkage when stitching.)
2. Place your stitched background face down on a towel and then iron. (The towel will make sure that your fabric doesn't wrinkle around your stitching.)
3. Trim your background down to 6" x 8".
4. From your fat quarter, cut 2 strips 2" x 8" for your side borders. Cut 2 more strips 2" x 9" for your top and bottom border.
5. Sew a 2" x 8" strip to each side of your background using a 1/4" seam allowance. Press your seams towards the outside.
6. Now sew a 2" x 9" strip to the top and bottom. Again press your seams to the outside.
7. From your fat quarter, cut your backing the same dimensions as your quilt top. (Your quilt top should measure 9" x 11".)
8. From the remainder of your fat quarter, cut 4 strips 2" x 5". These are your tabs.
9. Using a ruler, draw a horizontal line down the wrong side of the center of two of your tabs.
10. Using the line as a placement guide, place the 45 degree mark of your ruler on this center line and draw a line on either end creating an arrow.
This will give you your stitching line to create the point of your tab.
11. Match each tab that you marked with an unmarked tab placing right sides together. You should now have two sets of tabs.
12. Using a 1/4" seam allowance, start sewing down the long side of one tab. Be sure to lock your stitches when you begin sewing. When you reach the start of your arrow, stop with your needle down and pivot the tab.
13. Continue sewing on the line until you reach the point. Take one stitch horizontally across the point before continuing up the other side. (This extra stitch will allow you to get a sharper point.)
14. Finish sewing the other side of the tab, remembering to lock your stitches when you've finished.
15. Repeat for the second tab.
16. Trim the excess fabric from each side of your tab as shown below. This will reduce bulk when you turn them inside out.
17. Turn both tabs inside out and press. A tube turner will make quick work of this if you have one.
Take your time pressing these tabs. It will make a difference in your finished quilt. Your tabs should finish 1.5" x 4.75" or so. Just make sure both tabs are the same height.
18. Place your backing fabric right side up. Put a tab 3/4" in from each side aligning the raw edges.
19. Lay your quilt top right side down on top of this and pin.
20. Sew this quilt sandwich together but leave a 6" opening at the bottom for turning. Turn right side out and press.
21. This step is optional. Iron your fusible webbing to the inside seam allowance at the bottom of your quilt. This will allow you to fuse this opening closed after you've inserted the batting.
22. Now it's time to insert your 8.5" x 10.5" piece of batting. This should be the exact size of your quilt. I fold the two long sides of the batting towards the center before sliding it in to the opening. I can then smooth out the folds to both sides. Make sure you have batting in each corner.
23. If you used the fusible webbing in step 21, now is the time to remove the paper backing and iron your opening closed. Otherwise, you can stitch it closed by hand.
24. Quilt 1/4" inside the outside edge of your quilt using a coordinating thread. This will keep your batting in place. Then quilt the remainder of your top as desired. Because this is such a small quilt, even just stitching in the ditch between your embroidery and border is enough to keep it together. I did some additional quilting on the March block including cross-hatching in the border and outlining some of the embroidery. It's all a matter of personal taste.
25. Following the manufacturer's instructions, attach a 3/4" x 1" piece of velcro to both tabs and the top of your quilt as shown. (If you round the corners of your velcro pieces, they're less likely to pull off.)
26. Finally, sew a button to the back side of each tab by hand.
Voila! You have a mini quilt top that was quick to make and easy to change out by month or season.
Please let me know if you have any questions! I'd also love some feedback as this is my first tutorial.
Until later...


Great tutorial.
ReplyDelete