Sunday, October 30, 2011

Under the Sea...

I'm excited to report that I've finished another quilt!  This latest one also happens to be my very first Schnibbles quilt.  I've been wanting to make one for a while, but it always seemed like other things had precedence.  The pattern for this one is called Cindy Lou Who.

"Under the Sea" Schnibbles Quilt
Although this was my first, it won't be my last.  I have several other Schnibbles patterns that I look forward to making.  I found Carrie Nelson's instructions to be clear and easy to understand.  These patterns are also Charm Pack friendly quilts.  I used 2 Charm Packs of Odyssea by MoMo along with some Kona White to make the center of this quilt.  In fact, I had enough charm squares left over to make a label and a little pouch bag...

"Under the Sea" Label
Storage Pouch made with leftover charm squares
I spray basted this quilt with a (new to me) temporary basting spray that I got from JoAnn's.  (Sorry, but I can't recall the name.)  It's only supposed to hold for 2-5 days before disappearing, but I found that it wasn't quite strong enough.  While doing some straight stitching, the fabric shifted in a couple of places and I had to take it out and re-do it.  Live and learn though!  From now on I'll stick with my 505 Spray for such tasks.  I also used my trusty painter's tape to mark straight lines...

Marking quilting lines with painter's tape
Because the fabric has a nautical theme, I used my embroidery machine to quilt anchors and such on it.  I ended up re-hooping the quilt 34 times to get all the embroidery on it, but I think it really fits with the fabrics...

Hooping the quilt for embroidery
Embroidering in the border
Quilting from the backside
I'm estimating that it took me twice as long to quilt this as it did to piece it, but now that it's done, I think it was worth it.  That's usually the case for me.  I generally enjoy piecing more than quilting, but I'm always happy when I put forth the effort to really finish a quilt.

Closeup of the quilting
Another closeup of the quilting
So, here are the stats for this quilt:
  • Size: 32" square
  • Fabrics: 2 Charm Packs of Odyssea, Kona Cotton White, Batiks from my stash for the border, backing and binding
  • Batting: Warm &White
  • Thread: Aurifil (piecing and quilting), Invisible Thread for some quilting
  • Pattern: Cindy Lou Who by Carrie Nelson
  • Quilting: Stitched in the ditch, cross-hatching and embroidery (34 times)
  • Started: October 11, 2011
  • Completed: October 27, 2011
  • Recipient: Nicki Lee from The Twelve of Us
I'm glad to have finished this little quilt and am really pleased with how it turned out.  It's fun to work on a project that doesn't take a tremendous amount of time and is quick to put together.  Now back to working on that king-size quilt!  (Also fun, but a bit more time consuming!)

I managed to take this rare picture of Gabriel and David napping together.  Aren't they adorable?

Gabriel and David - napping in the sun
Until later...

A generous man will prosper and he who refreshes others will himself be refreshed.  
Proverbs 11:25 (NIV)

Saturday, October 29, 2011

Stash Report Week #43...

October 22- 28, 2011

This was another week in which I purchased no fabric.  I probably won't be able to say the same next week though, because I need to order the backing fabric for one of my quilts. 

I also didn't use much this week, although I do have a couple of small finishes.  First, I used 1.25 yards for the backing and binding on this Schnibbles quilt.  I'll share more about it in my next post.

"Under the Sea" Schnibbles Quilt
I also made this cute little pouch using the tutorial from Pretty By Hand.  From start to finish, it took me about 2 hours to cut and sew.  I've stuffed it full of candy and it will be a gift for someone.  In fact, I'm considering making a few more for Christmas as they go together so quickly.

Little storage pouch
So...
Purchased-this-week: 0 yards
Used-this-week: 1.5 yards
Purchased-to-date: 363.5 yards
Used-to-date: 496.75 yards
Net used: 133.25 yards

Now that I've finished the Schnibbles quilt, I'm back to working on the 45 and Life To Go quilt.  I'm optimistic that I'll finish the top within the next week.   I've also got another fall quilt I'd like to get quilted before winter's here and another quilt that I need to load on the frame.  Busy as usual!  Hopefully you get to spend some time this next week doing something you enjoy - whether it's quilting or something completely different!

Until later...

The heartfelt counsel of a friend is as sweet as perfume and incense. 
Proverbs 27:9 (NLT)

Tuesday, October 25, 2011

A glimpse of applique...

Every time I post pictures of my latest applique block or project, people ask me what method I use to stitch them.  I completely understand the impulse; I'm always curious as well.  Perhaps there's a new technique out there I haven't tried that will be faster and more accurate.  In the search for that elusive method, I've tried all of them - or at least all of those I've heard about - and the Back-Basting Hand Applique method is my preferred one.  (If you have no idea what I'm talking about, you can go here and here to see some of the blocks I've stitched.)

In an effort to assuage your curiosity, I took a few pictures of the steps.  This is not a tutorial, but just a glimpse into how it's done.  If you're interested in learning more, let me know and I could put together a tutorial, or you can always do a search on the internet.

Note: To do this kind of applique, I use two different types of thread and needles.  I use a regular needle and sewing thread (50 wt.) to do the basting.  I use the tiny needle (John James Size 11 Between) and YLI Silk Thread (100 wt) to do the needleturn.  You can see the difference here in sizes.  I also double up the sewing thread so it's even thicker when basting...

2 Types of Needles and Thread
The first step is to trace the reverse of your pattern on the 
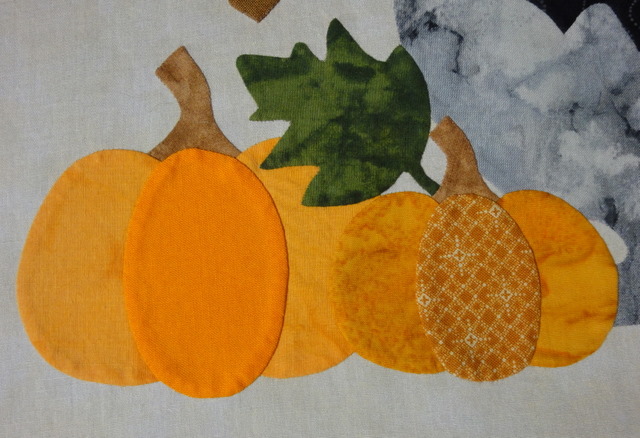
back side of your fabric.  Here's the Baltimore Halloween block traced out before I started any stitching...

The outline of my block traced on the wrong side of the fabric
For Back-Basting Applique, you baste each of your pieces in place first.  The idea is that your basting stitches will act to mark your fabric.  When you remove the stitches, your fabric naturally wants to turn under where the stitches were.  It's sort of like folding a piece of perforated paper.  It's just naturally wants to fold along the perforation. 

The fabric I'm using for the leaf is pinned to the front of my block and I make sure it covers all around the piece I'm appliqueing.  You can just barely see the shadow of the green fabric I'm using around the outside edges of the leaf. 

Fabric pinned in place and ready for basting
Then I baste directly on the drawn line using my double thickness of thread.  The end of this leaf is under another leaf, so I just extend my basting stitches there...

First leaf basted in place
Here's what it looks like from the right side of my block...

Leaf basted in place from the right side
I then cut around the piece leaving my seam allowance.  I also clip into the curves where necessary...

Basted, cut and clipped leaf - ready to applique
Starting from one end, I begin removing a few of the basting stitches and turning under the seam allowance.  It turns under very easily at this point because it's been 'trained' by the basting thread.

Starting to needleturn...
I continue to make my way around the leaf, removing a few basting stitches and sewing down the edge...


Until I finally reach the end...


You'll notice that the very end of the leaf isn't turned under.  That's because it falls underneath another piece and won't be visible when this block is done.  Here's a picture of the back of the leaf.  You can see how closely I was able to follow the drawn line...

Backside of the leaf
That's why I like this method so much.  It does take longer than traditional needleturn, but it's also a lot more accurate for me.

Hopefully this gave you enough of a glimpse to see if you'd ever be interested in trying it.  As in most things, there's more than one way to applique and I know for some, this won't be it.  But for others, who knows...

For a little comedic relief, check out these pictures of David.  I'd swear that belly is growing day by day.


Until later...

Lead me by your truth and teach me, for you are the God who saves me. All day long I put my hope in you. 
Psalm 25:5 (NLT)

Saturday, October 22, 2011

Stash Report Week #42...

October 15 - 21, 2011

Not too much longer left in the year.  Only another 10 weeks and we'll be ringing in 2012!  I have lots more I hope to finish though, so I hope it doesn't come too fast.

This week's stash report is really short.  I didn't buy any fabric and the only thing I finished is the final Baltimore Halloween block.  It used about a yard.

Baltimore Halloween Block #13
So...
Purchased-this-week: 0 yards
Used-this-week: 1 yards
Purchased-to-date: 363.5 yards
Used-to-date: 495.25 yards
Net used: 131.75 yards

My goal this week is to continue working on 45 and Life to Go and to quilt a small wallhanging.  I only spent 5 hours in my sewing room this past week, but I'm hoping I'll get a chance to spend more time in there the next week.

Until later...

Let all that I am praise the Lord; may I never forget the good things he does for me. 
Psalm 103:2 (NLT)

Woo hoo!

I'm doing a little happy dance right now!  You should see me getting jiggy with it.  On second thought, it's better that you don't.  (Trust me on this one!)

The reason I'm so excited is that I've finally finished the last block for my Baltimore Halloween quilt.  I've been working on this quilt for almost 3 years, so this is huge

Baltimore Halloween - Block #13
It's a busy block, isn't it?  It finishes at 20" square and has 165 pieces in it - including 15 acorns.  I mention the acorns, because appliqueing down their caps was (for me) the most challenging part.

Some of the multitude of acorns
I was so excited when I finished appliqueing all the pieces down, that I stayed up late so I could also finish the hand embroidery.  Fortunately, there wasn't too much of it.  I had to add some details to the ghosts and the spider...

Embroidered face on the ghost
Spider with his spots, eyes and legs
The next step to this quilt is to assemble all 13 blocks together, add 3 borders and then applique another 20 bats on the borders.  I don't have quite enough of one of the fabrics, so I'm going to have to make a small shopping trip before I can continue on this.  In the meantime, I've prepped the next Ladies of the Sea block and will start working on that.  Each ship generally takes me about a month to applique (so this is another long term project).

But in the meantime, here are some more pictures of the finished block...


I've had a number of people ask me what method I use to do my applique.  I used the Back-Basting Hand Applique method for all of these blocks.  I find it's more accurate for me, even though it does take slightly longer.  I took some pictures to illustrate how I do it (for those who are curious) and I'll share them in the next couple of days.  There are also some great tutorials out there if you do a search.

Until later...

Fire goes out without wood, and quarrels disappear when gossip stops. 
Proverbs 26:20, NLT

Tuesday, October 18, 2011

Stash Report Week #37 - 41...

September 10 - October 14, 2011

I am so behind on my stash reports.  To catch up, to this one covers the last 5 weeks.  Hopefully I can keep all the numbers straight!.

First off, I purchased some Hometown fabric to make a table runner for my sunroom.  I believe there's a total of 3.25 yards here - including the backing fabric.  I'm going to use a slightly modified version of the Pathways and Crossroads Quilt Pattern to make it.

Hometown Fabrics for Sunroom Runner
I also bought 7 yards of Just Wing It by MoMo to use for borders, backing and binding.  This should be enough fabric, along with a Layer Cake I received for my birthday, to make a nice sized quilt.  And best of all, the yardage was on clearance for half off!

Just Wing It Layer Cake and Yardage
Since I saw the quilt 45 and Life to Go earlier this year, I've been imagining it on our bed.  I purchased the pattern and kit from Primitive Gatherings.  The kit includes 16.5 yards for the 110" square version.  That's a lot of fabric, but the quilt is going together beautifully so far.  (I'll share my progress in a future post.)

45 and Life to Go Quilt Kit
The rest of my purchases were from the 2011 Stash Dash.  I bought a FQ Bundle of Little Gatherings and a Charm Pack of Primitive Muslin - both made by Primitive Gatherings.  There's 10.75 yards between the 2 of them.

Little Gatherings and Primitive Muslin
I also bought a Layer Cake and Jelly Roll of Panier de Fleurs by French General.  This shop was having an amazing sale on pre-cuts that day (in case you couldn't tell).  That's another 5.5 yards.

Panier de Fleurs Layer Cake and Jelly Roll
And finally, I bought 2 yards of assorted Christmas prints.  I believe three of them are from Jovial and I'm not certain about the last.

Christmas Fabric
Doesn't it sound like all I've been doing is shopping the last 5 weeks?  Would you be surprised to learn that all of it entered my stash in less than a week?  I actually haven't purchased even a scrap of fabric in more than 4 weeks now.  With all that's come in, I couldn't possibly need any more!

In the last 5 weeks, I've also managed to complete 3 quilts and 2 quilt tops.  I've already done posts on the finished quilts, so I'll just add a picture and link for those...

Orange Sherbert - I used 4 yards for the Backing/Binding
Harmony - I used 5 yards for the Backing/Binding
Splash - I used 4.5 yards for the Backing/Binding
I'm in the process of quilting this Dresden Plate Table Runner.  It's slow going though because I'm using my walking foot and there's a lot of twisting and turning of the quilt.

Festivities - I used 2.75 yards for the top
I finished piecing this last quilt at the retreat I just attended.  I'm hoping for a quick turn around on this one...

Cindy Lou Who - I used 2 yards for the top
So...
Purchased-this-week: 45 yards
Used-this-week: 18.25 yards
Purchased-to-date: 363.5 yards
Used-to-date: 494.25 yards
Net used: 130.75 yards

For no particular reason (other than I think she's adorable), here's a picture of Jack on the her binkie...

Jack
Until later...

Do your own work well, and then you will have something to be proud of. But don’t compare yourself with others.” 
 Galatians 6:4 (CEV)

Sunday, October 16, 2011

I'm back...

I'm back from 5 days/4 nights in beautiful Williamsburg, Va where I exercised very little, slept even less, enjoyed some wonderful company and home-cooked meals and sewed, sewed, sewed!  I so enjoyed myself and spending time with such talented and nice ladies. 

It's going to take me some time to organize my pictures, write blog posts and most of all continue working on my quilts, but I wanted to share a few pictures of one of the projects worked on there.  The pattern is called Weaver Fever by Jackie Robinson and 4 of the ladies (not me) were adventurous enough to attempt it.  Each quilt has 9 different fabrics, 12 different strip sets and a gazillion 1.5" strips. In every case, it resulted in a gorgeous quilt.  (Or it will.  None of these quilts is quite finished yet. )

Verna's Blue/Green Weaver Fever
Carolyn's Blue/Yellow/Red Weaver Fever
Tamah's Blue/Green/White Weaver Fever
Last but not least is Kathy's quilt.  She made all her strip sets, but only one block.  She wanted to make sure she understood the process, but then went on to work on number of other projects. 

Kathy's Blue/Green Weaver Fever
I think these quilts are beautiful in the pictures, but they truly look even better in person. 

I hope to be back in the next couple of days with some pictures of what I accomplished last week, as well as a very belated stash report.

Until later...

Think about the things of heaven, not the things of earth. 
Colossians 3:2 (NLT)